Hey There, Dessert Dreamers! Let’s Talk Guilt-Free Indulgence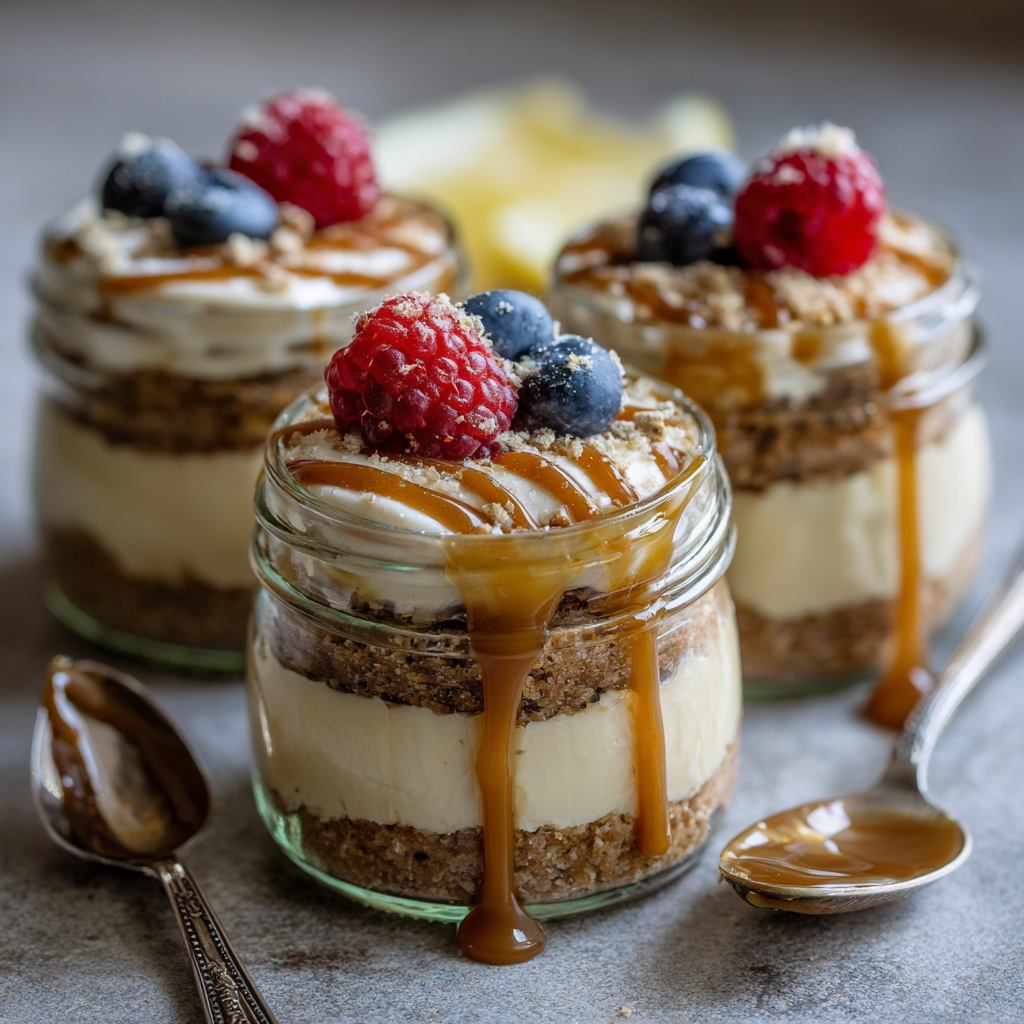
Ever find yourself staring into the fridge after a workout, craving something creamy and decadent but knowing you should reach for that sad tub of cottage cheese instead? Oh friend, I’ve been there too—standing in my sweatpants, post-gym hunger roaring, feeling torn between my taste buds and my protein goals. That’s exactly why I fell head-over-apron for these High Protein Cheesecake Jars. Inspired by that viral TikTok trend (you know the one!), I’ve spent months tweaking and tasting to create a version that’s actually satisfying—no chalky aftertaste or cardboard texture in sight. Imagine velvety cheesecake filling hugging a buttery crust, all packed into a cute jar you can grab with one hand. We’re talking 20g of protein per jar, zero baking drama, and flavors that’ll make your spoon dance. Whether you’re meal-prepping for hectic weeks, needing a post-workout win, or just really deserving a treat that loves you back—this is your kitchen victory waiting to happen. Let’s ditch the diet despair and build jars of joy!
That Time My Sweet Tooth Saved Leg Day
PrintEasy High Protein Cheesecake Jars

Inspired by dessert cravings and protein goals, these jars became my go-to fix after too many snack-time regrets. Imagine rich cheesecake with none of the guilt—just spoon, scoop, and smile. They’re portioned for control, loaded with protein, and portable for life on the move. Whether it’s post-gym or post-meeting, these are the jars you didn’t know you needed.
- Prep Time: 15 minutes
- Cook Time: 2 hours
- Total Time: 2 hours 15 minutes
- Yield: 6 jars 1x
Ingredients
Crust Ingredients:
1 cup almond flour (or crushed graham crackers)
2 tbsp melted coconut oil or butter
1–2 tbsp sweetener of choice
Filling Ingredients:
8 oz low-fat cream cheese, softened
1 cup Greek yogurt (2% or non-fat)
1–2 scoops vanilla protein powder
2–3 tbsp sweetener (maple syrup, honey, or sugar-free)
1 tsp vanilla extract
Optional: 1–2 tbsp lemon juice for a zesty lift
Instructions
Make the Crust: Mix almond flour, oil, and sweetener until it feels like damp sand. Press 2–3 tbsp into small jars (4–6 oz). Chill 10–15 mins or bake at 350°F for 8–10 mins until golden.
Mix the Filling: Beat cream cheese until smooth. Add Greek yogurt and blend. Mix in protein powder one scoop at a time, then sweetener and vanilla. Adjust flavor with lemon juice if desired.
Assemble: Layer about ¼ cup filling over crust in each jar. Add toppings like berries, nuts, or a drizzle of caramel.
Chill: Refrigerate at least 2 hours—overnight is even better for perfect texture.
Notes
Cheesecake without compromise—delicious, nutritious, and made for real life.
Nutrition
- Calories: ~220
- Fat: 10–15g
- Carbohydrates: 10–15g
- Protein: 18–22g
Picture this: It’s last summer, and I’m training for a charity hike. After brutal leg days, all I wanted was my grandma’s legendary cherry cheesecake… but my fitness tracker would’ve thrown a fit. One evening, covered in gym dust and determination, I spotted my niece making “cloud cheesecake” in mason jars on her phone. “Uncle Wyatt, it’s PROTEIN!” she declared, shoving a spoonful at me. Skeptical chef mode activated—until that first bite. Was it Nana’s level? Nah. But it was creamy, sweet, and shockingly good! Next thing I knew, I was raiding my pantry at midnight, swapping ingredients like a mad scientist. Greek yogurt subbed for sour cream, almond flour crunched like grahams, and vanilla protein powder became the secret weapon. When my hiking crew tried them? Let’s just say those jars disappeared faster than my motivation on leg day #3. Now they’re my edible high-fives after every workout—and my favorite way to wink at tradition without unbuttoning my jeans.
Your Cheesecake Toolkit: Simple, Smart & Swap-Friendly
Crust Ingredients:
- 1 cup almond flour – Gives a nutty, toasty base that’s gluten-free! Chef’s swap: Crushed graham crackers (about 8 sheets) for classic vibes.
- 2 tbsp melted coconut oil or butter – Coconut oil keeps it dairy-free, but butter? Oh, that’s flavor town. Insider tip: If using butter, brown it first for a caramel kiss!
- 1–2 tbsp sweetener – Maple syrup, honey, or zero-calorie monk fruit. Pro move: Start with 1 tbsp—you can add more after mixing!
Filling Ingredients:
- 8 oz low-fat cream cheese, softened – Non-negotiable: FULL FAT works too, but low-fat keeps protein high and cals in check. MUST be room temp or you’ll get lumps!
- 1 cup Greek yogurt (2% or non-fat) – The protein powerhouse! Swap alert: Skyr for extra thickness, or dairy-free coconut yogurt.
- 1–2 scoops vanilla protein powder – Whey-casein blend works best (not collagen!). Flavor boost: Chocolate or strawberry powder? Yes, please!
- 2–3 tbsp sweetener – Adjust to your tooth! Sugar-free erythritol blends seamlessly.
- 1 tsp vanilla extract – Splurge on real vanilla. Your taste buds will thank you.
- Optional: 1–2 tbsp lemon juice – Brightens everything up! Zest hack: Add 1 tsp lemon zest for sunny vibes.
Building Your Jarred Masterpiece: Step-by-Step Magic
Step 1: Make the Crust (The Foundation of Happiness!)
Grab a medium bowl—no fancy mixer needed here. Dump in your almond flour, melted coconut oil (or that glorious brown butter!), and sweetener. Now channel your inner beach-goer: mix until it feels like damp sand that just holds together when you squeeze it. Too dry? Add ½ tsp oil. Too wet? Sprinkle in more flour. Portion 2-3 tbsp into each jar (I use 6-oz mason jars). Press it down HARD with a shot glass or spoon—this prevents crust-crumble-apocalypse later! Bake or no-bake? For extra toasty goodness, bake at 350°F for 8-10 mins until golden. Too lazy? Chill 15 mins. Either way, let it cool completely. Chef’s hack: Sprinkle a pinch of salt over the crust pre-baking. Sweet-salty magic!
Step 2: Whip the Filling (Creamy Dreams Ahead!)
In a large bowl, beat the softened cream cheese FIRST until it’s smoother than a jazz playlist (about 1 min). Scrape the bowl! Now add Greek yogurt. Blend until unified—no streaks! Critical protein step: Add protein powder ONE scoop at a time, whisking like you mean it. Adding it all at once? That’s lump city. Now drizzle in sweetener and vanilla. Taste! Want zing? Squeeze in lemon juice. Texture tip: If it’s too thick (common with plant protein), splash in 1 tbsp almond milk. Too thin? Chill for 20 mins before layering.
Step 3: Assemble Like a Pro (Layering = Love!)
Scoop ¼ cup filling over each cooled crust. Tap jars gently on the counter to settle. Now—don’t rush this—pop them uncovered in the fridge for 15 mins. This sets the base layer so toppings won’t sink! Add another 2 tbsp filling per jar if you’re feeling extra. Top it your way: Fresh berries, sugar-free chocolate chips, toasted almonds, or a cheeky caramel drizzle. Go wild!
Step 4: The Big Chill (Patience, Grasshopper!)
Cover jars with lids or plastic wrap. Refrigerate for at least 2 hours—but overnight? That’s the sweet spot. The filling firms into silky perfection. Emergency cheat: Freeze for 45 mins if you’re desperate, but texture won’t be as lush.
Jar Presentation: Eat Pretty, Anywhere!
These babies are portable perfection—screw on the lids and toss ’em in your gym bag or lunchbox! For home enjoyment, top with a fresh berry skewer or mint sprig right before serving. Pair with espresso for a “fancy brunch” vibe or crumble a protein bar over the top for crunch. Pro tip: Eat straight from the jar with a long-handled spoon—maximum cozy vibes. No dishes? That’s the dream!
Shake It Up! 5 Delicious Twists
- Chocolate-PB Cup: Add 2 tbsp cocoa powder + 1 tbsp PB2 to filling. Top with dark chocolate shavings.
- Berry Cheesecake: Swirl 2 tbsp mashed raspberries into filling. Use oat flour crust.
- Pumpkin Spice: Replace ¼ cup yogurt with canned pumpkin + 1 tsp pumpkin spice.
- Vegan Vibes: Dairy-free cream cheese, coconut yogurt, and plant protein powder. Crust with almond butter instead of oil!
- Cookie Dough: Mix 1 tbsp almond butter + mini chocolate chips into filling. Crust with blended chickpeas? Trust me.
Wyatt’s Whispered Wisdom
Okay, real talk: My first batch tasted like sweetened gym chalk. The crime? Using a cheap whey protein. Lesson learned: invest in a quality powder—look for “casein blend” or “dessert protein” on the label. Also, these jars evolved from “meh” to “MORE!” when I started browning the butter for the crust—it adds a nutty depth that’s *chef’s kiss*. One night, I accidentally used lemon curd instead of juice… and created a viral “lemon burst” version my followers still beg for! Storage tip: They keep for 4 days in the fridge, but freeze beautifully for 3 weeks—just thaw overnight. Last pro tip? Always make six jars. Because “taste testing” means you’ll eat two before they even chill. No judgment here!
Your Cheesecake Jar SOS Guide
Q: Why is my filling gritty?
A> Two culprits! 1) Cream cheese wasn’t fully softened (microwave 10 seconds if needed). 2) Protein powder dumped in too fast—always mix incrementally!
Q: Can I skip the protein powder?
A> Sure, but you’ll lose the protein punch. Instead, add ¼ cup powdered peanut butter + 1 extra tbsp sweetener. Texture will be softer—chill longer!
Q: Crust won’t stick together—help!
A> You need more binder! Add ½ tsp melted coconut oil OR 1 tsp water. Press HARDER—use the bottom of a measuring cup.
Q: Mine turned out watery after chilling?
A> Likely too much lemon juice or thin yogurt. Fix: Next time, strain Greek yogurt overnight. For rescue, stir 1 tsp cornstarch into filling pre-chill.
Fuel Facts (Per Jar!)
Calories: ~220 | Protein: 18–22g | Carbs: 10–15g (net: 7–10g) | Fat: 8–12g
*Calculated with low-fat cream cheese, monk fruit sweetener, and 1.5 scoops whey-casein protein powder. Values vary with swaps!
FINAL THOUGHTS
There you have it, dessert dreamers—proof that indulgence and protein goals can absolutely coexist in a cute little jar. Whether you’re fueling post-workout, meal-prepping like a kitchen boss, or just craving something sweet that doesn’t leave you in a sugar coma, these High Protein Cheesecake Jars are your new fridge MVP. They’re quick, endlessly customizable, and secretly packed with goodness—just the way Wyatt likes it. So grab those mason jars and that spoon. Your inner gym rat and your sweet tooth are about to do a happy dance.