Hey Y’all, Let’s Make Some Strawberry Mochi Magic!
Picture this: a bite-sized treat that’s pillowy soft on the outside, bursting with creamy strawberry joy on the inside, and so pretty it’ll make your Instagram feed blush. That’s Strawberry Mochi Delight, friends – and today, we’re whipping it up together! No fancy pastry degree required, just a microwave, a mixing bowl, and that giddy excitement you get when dessert feels like a hug. 🍓✨
Mochi’s one of those kitchen adventures I adore because it turns simple pantry staples into pure wow. Glutinous rice flour? It’s your ticket to that addictive chew. Whipped cream and strawberry purée? That’s the cloud-like filling dreams are made of. And that pastel-pink dough? Pure happiness in edible form. Whether you’re prepping for a picnic, craving a sweet solo moment, or just want to impress your book club, this recipe’s your golden ticket. So tie on that apron, crank up your favorite tunes, and let’s turn your kitchen into a mochi wonderland!
Grandma’s Berries & My First Mochi Mishap
PrintStrawberry Mochi Delight
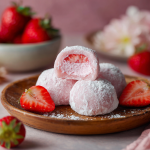
Soft, chewy, and bursting with berry goodness, this strawberry mochi is a dreamy fusion of creamy filling wrapped in a tender, pastel-pink dough. Whether you’re impressing guests or treating yourself, this recipe turns everyday ingredients into a magical bite-sized dessert. Time to roll up your sleeves and dive into mochi heaven!
- Prep Time: 25 mins
- chill time: 30 mins
- Cook Time: 5 mins
- Total Time: 1 hour
- Yield: 6–8 pieces 1x
Ingredients
For the mochi dough:
100g glutinous rice flour
30g corn starch
35g sugar
180ml milk
2–3 drops strawberry food coloring
15g butter
For the strawberry cream filling:
150ml non-dairy whipping cream
50ml dairy whipping cream
1–2 tbsp condensed milk
3 tbsp strawberry purée
Instructions
Whip the filling: In a chilled bowl, beat both whipping creams together until soft peaks form. Gently fold in the condensed milk and strawberry purée. Scoop into small portions and freeze until firm.
Cook the mochi dough: In a bowl, whisk rice flour, corn starch, sugar, milk, and food coloring. Microwave for 2 minutes, stir, and heat again in 1-minute intervals until it thickens. Stir in the butter until smooth and shiny.
Cool and portion: Once the dough cools slightly, dust a surface with cornstarch and divide the mochi into small balls.
Assemble: Flatten each mochi round, place a frozen cream ball in the center, and pinch to seal. Shape gently into a ball.
Chill & enjoy: Refrigerate for 30 minutes before serving for the perfect texture.
Nutrition
- Calories: 130
- Fat: 6g
- Carbohydrates: 18g
- Protein: 1g
This recipe takes me straight back to summers at my grandma’s farm. She’d send me out to pick strawberries at dawn – still dewy and sun-warmed – while she’d hum old hymns in her tiny kitchen. One year, I tried surprising her with homemade mochi. Key word: tried. I used regular flour instead of glutinous rice flour (rookie move!), and my “mochi” turned into sad, crumbly pucks. Grandma just laughed, handed me a spoon, and said, “Wyatt, sugar, even kitchen flops taste better with fresh berries.” We salvaged the filling, ate it with her shortcake, and I’ve chased that perfect strawberry-mochi combo ever since. Moral? Mistakes make the best stories… and this recipe’s foolproof, I promise!
Gather Your Mochi-Making Squad 🛒
Makes 6-8 dreamy mochi bites
For the Strawberry Cream Filling
- 150ml non-dairy whipping cream (Like Rich’s® or coconut cream! Lighter than heavy cream and whips up stiffer for easier filling.)
- 50ml dairy whipping cream (Adds richness! Swap all non-dairy if needed, but texture’s best with this combo.)
- 1-2 tbsp condensed milk (Sweetens & stabilizes. Start with 1 tbsp – add more if your berries are tart!)
- 3 tbsp strawberry purée (Blitz fresh or frozen berries! Strain seeds if you’re fancy, but I love the rustic bits.)
For the Pink Mochi Dough
- 100g glutinous rice flour (A.K.A. mochiko flour – must be glutinous for chew! Find it in Asian markets or online.)
- 30g corn starch (Keeps dough soft & prevents sticky hands. Potato starch works too!)
- 35g sugar (Fine white sugar melts quick. Want less sweet? Drop to 25g.)
- 180ml milk (Whole milk = creamier dough. Almond milk works for dairy-free!)
- 2-3 drops strawberry food coloring (Optional but pretty! Use beet juice for natural pink.)
- 15g butter (Makes dough shiny & pliable. Vegan butter? Absolutely!)
Chef’s Tip: Chill your bowl & beaters before whipping cream! Cold = faster peaks.
Let’s Build Some Mochi! 👩🍳
Follow these steps – and my crunchy-to-chewy journey – for mochi glory:
- Whip That Berry Bliss: Grab your chilled bowl (trust me, warmth is cream’s enemy!). Beat both whipping creams until soft peaks form – they should hold shape but flop gently. Fold in condensed milk and strawberry purée slowly with a spatula. Don’t overmix! Scoop tablespoon-sized dollops onto parchment paper, freeze 1 hour. (Why freeze? Firm filling won’t squirt out when wrapping!)
- Microwave Magic for Dough: Whisk rice flour, corn starch, sugar, milk, and food coloring in a microwave-safe bowl. Nuke for 2 minutes. Stir well – it’ll look lumpy, that’s normal! Microwave in 30-second bursts, stirring between, until thick and stretchy (about 2-3 mins total). Pro Hack: Poke it! No wet streaks? Done!
- Butter Up That Beauty: Hot dough alert! Drop in butter – it’ll sizzle. Stir vigorously with a spatula or stand mixer paddle until butter melts and dough becomes smooth, glossy, and pulls away from sides. Cover with damp cloth. Cool 10 mins. (Patience, padawan… hot dough burns fingers!)
- Dust, Divide & Conquer: Spread corn starch on your counter. Plop dough on it, dust top lightly. Divide into 6-8 pieces. Roll into balls, then flatten each into a 3-inch circle with your palms or a rolling pin. Keep unused dough covered!
- Wrap & Seal Like a Pro: Place a frozen filling ball in the center of a dough circle. Gently pull edges up around filling, pinching seams closed. Roll gently between palms to smooth. If dough tears? Patch it with a tiny scrap! Chef’s Confession: My first three looked like lumpy aliens. They still tasted bomb.
- Chill Out & Devour: Arrange mochi on a plate, cover loosely. Fridge for 30+ minutes. This is KEY for that perfect chewy-but-not-gummy texture. Serve cool! 🎉
Show Off Your Mochi Masterpieces ✨
Presentation’s half the fun! For that “wow” factor, arrange your pink mochi on a slate board or pastel plate. Dust lightly with powdered sugar or matcha powder for contrast. Pop a tiny fresh strawberry leaf or edible flower on top – instant elegance! These are best eaten within 24 hours (the filling softens over time), so share ’em fast… or don’t. I won’t judge your “quality control” snacking. Pair with hot green tea or a fizzy Prosecco for a killer combo!
Mix It Up! Your Mochi, Your Rules 🔄
- Chocolate-Berry Swirl: Add 1 tbsp cocoa powder to half the filling. Swirl with strawberry filling before freezing!
- Tropical Twist: Swap strawberry purée for mango or passionfruit. Top with toasted coconut flakes.
- Vegan Joy: Use all non-dairy cream, vegan butter, and coconut condensed milk.
- Nutty Surprise: Hide a single raspberry or a few chocolate chips inside the cream filling.
- Matcha Mood: Replace strawberry coloring with 1 tsp matcha powder for green tea mochi bliss.
Wyatt’s Whispered Wisdom (and Bloopers!)
This recipe’s evolved from my “crumbly puck” days! I started using half non-dairy cream after realizing it holds shape better in warm kitchens. And that microwave trick? Total game-changer vs. traditional steaming. Funny story: Once, I used beets for color and didn’t strain ’em… my mochi looked like tiny brains. Tasted great though! 🌟 Biggest lesson? Mochi dough dries out fast. Keep it covered with a damp towel while working, and if it gets stiff, zap it for 5 SECONDS (no more!) to revive. These are meant to be rustic and joyful – imperfections add charm!
Mochi Rescue Squad: Your FAQs Answered! 🚑
Q: My filling melted everywhere when I wrapped it! Help?
A: Freeze longer! Filling should be solid as a mini ice cube. If your kitchen’s warm, work with one filling ball at a time.
Q: Why is my dough sticky/gummy?
A: Over-microwaving is the usual culprit. Stop when just stretchy! Also, dust surfaces generously with corn starch. Sticky fingers? Dip ’em in starch too.
Q: Can I make these ahead?
A> Absolutely! Assemble and refrigerate up to 2 days in an airtight container. Texture’s best day-of, though.
Q: No microwave? Panic?
A> Steam it! Pour batter into a greased pan, cover with foil, steam 20 mins over boiling water. Stir in butter after.
Quick Bite Breakdown 🍽️
Per mochi (based on 8 servings): Calories: ~130 | Fat: 6g | Carbs: 18g | Protein: 1g
Prep: 25 mins | Cook: 5 mins | Chill: 30 mins | Serves: 6-8

Final Thoughts:
Strawberry mochi is more than just a treat—it’s a little handheld celebration of sweetness, texture, and color. Whether you’re a mochi newbie or a chewy-dough devotee, this recipe brings joy with every pink, pillowy bite. It’s proof that even a simple microwave and a few pantry staples can transport you to dessert bliss. So go ahead—dust your hands with starch, embrace a little stickiness, and wrap up something magical. And if your mochi turns out a little lumpy or leaks a bit of cream? That just means you made it with heart.