Who Says Pasta Can’t Be Playful? Meet Your New Freezer BFF!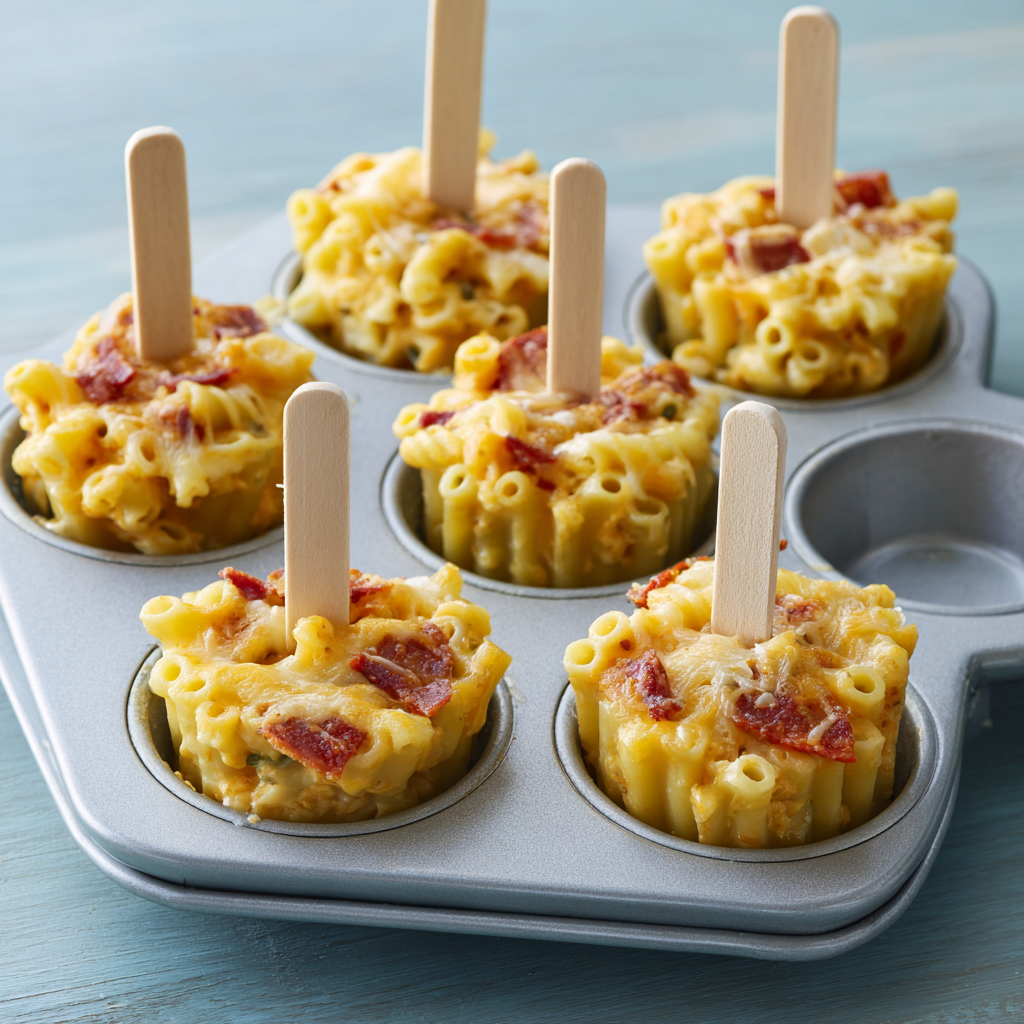
Hey there, kitchen comrades! Wyatt here, spatula in one hand and a big ol’ grin on my face. Let’s talk about breaking rules – specifically, the silly idea that pasta belongs only in bowls. Picture this: your favorite creamy mac and cheese or saucy spaghetti, transformed into handheld, dippable, stick-wielding Pasta Pops that live in your freezer like little flavor ice cubes. These aren’t just leftovers in disguise – they’re your secret weapon against hangry meltdowns, boring lunchboxes, and “what’s for snack?” emergencies. I’m talking golden-brown edges hugging a molten-cheese core, ready to warm up faster than you can say “pass the parm.”
Why do I adore these pops? Life’s messy! Between wrangling grocery bags, walking the dog, or helping with 3rd-grade math homework (bless those common denominators), we need joy that comes easy. These pops freeze like champs, reheat in minutes, and turn “meh” moments into mini celebrations. No fancy skills required – if you can stir pasta and press “start” on the microwave, you’re golden. So whether you’re packing lunches, hosting game night, or just craving that nostalgic mac-and-cheese hug at midnight (no judgment!), grab your muffin tin. Let’s make dinnertime feel like a county fair on a stick!
Pasta Pops & Picky Eaters: A Love Story
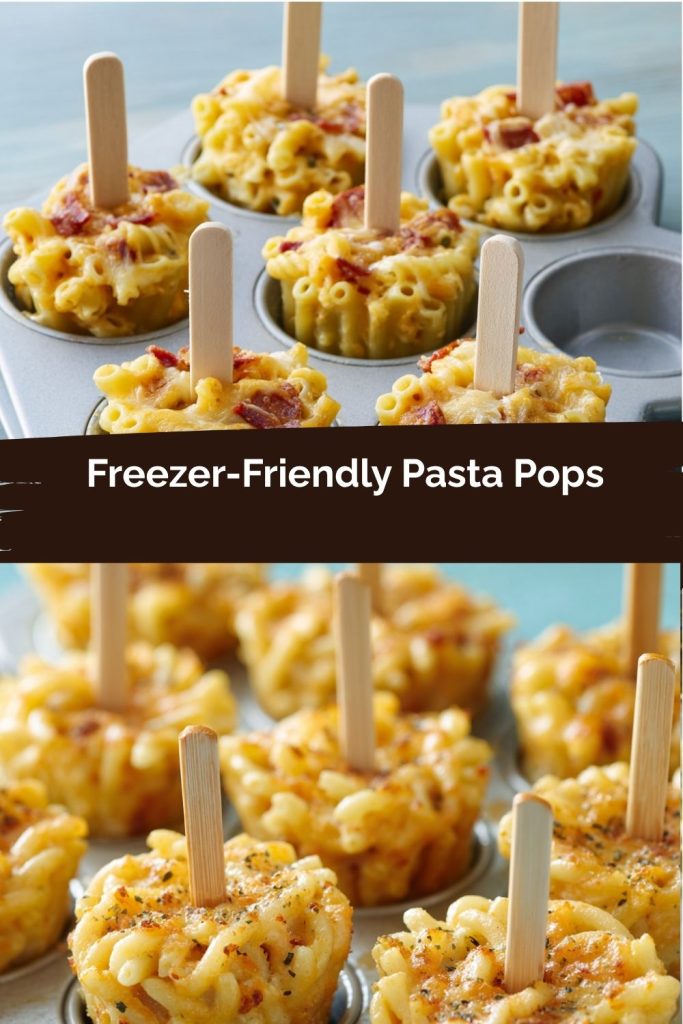
PrintFreezer-Friendly Pasta Pops

Who says pasta can’t be playful? These Freezer-Friendly Pasta Pops take your favorite mac and cheese or saucy spaghetti, mold them into muffin tins with sticks, and freeze into hand-held, reheat-ready bites. Perfect for lunchboxes, snacks, or party trays—just pop, warm, and enjoy that gooey, cheesy center!
- Prep Time: 10 minutes
- freeze time: 1 hour+
- Cook Time: 15 minutes
- Total Time: 56 minute
- Yield: 6–8 pasta pops 1x
Ingredients
2 cups cooked mac and cheese or spaghetti with sauce
1/2 cup shredded cheese (cheddar or mozzarella)
1 egg (to help bind)
Optional: diced veggies, mini pepperoni, breadcrumbs for crunch
Muffin tin + lollipop sticks or popsicle sticks
Instructions
Preheat oven to 375°F (190°C) if baking before freezing.
Mix cooked pasta with shredded cheese and egg in a bowl.
Scoop mixture into greased muffin tins, pressing down slightly.
Insert a stick into the center of each.
Bake for 12–15 minutes until set and slightly crisp on top.
Let cool completely, then freeze in tin or transfer to freezer bags.
Reheat in microwave or toaster oven until warm and melty.
Nutrition
- Calories: 160
- Fat: 7g
- Carbohydrates: 18g
- Fiber: 1g
- Protein: 6g
Flashback to last summer: My niece Lily, age 6, declared war on anything “mixed together.” Spaghetti? “Too sloppy.” Mac and cheese? “Too orange.” My sister was ready to surrender. Then inspiration struck during a chaotic kitchen experiment. I scooped leftover mac into muffin cups, jammed in popsicle sticks (hey, improvisation is my middle name!), and froze them. When Lily saw those golden nuggets on sticks, she eyed them like forbidden lollipops. “Uncle Wyatt, can I really hold my pasta?” One cautious bite later? Victory dance! She devoured two, sauce smeared ear-to-ear. That “aha!” moment stuck with me. Food should be fun, not a battleground. Now, every time I pop one of these bad boys out of the freezer, I hear Lily’s giggle and remember: sometimes dinner magic is just a stick away.
Your Pasta Pop Toolkit: Simple Stuff, Big Rewards
- 2 cups cooked mac and cheese or spaghetti with sauce – Leftovers are GOLD here! For mac, elbows hold sauce best. Spaghetti? Chop strands to 1-inch pieces so they mold neatly. Pro tip: Slightly saucier than usual prevents dry pops!
- 1/2 cup shredded cheese (cheddar or mozzarella) – Cheddar = bold tang, mozz = epic stretch! Shred it yourself – pre-shredded has anti-caking agents that mess with meltiness. Got pepper jack? Throw it in for a kick!
- 1 egg – Our MVP binder! Whisk it first for even distribution. Allergic? Swap 1 tbsp ground flaxseed + 3 tbsp water (let sit 5 mins to gel).
- Optional Mix-Ins & Toppers – Diced veggies (spinach, bell peppers – sauté first to soften!), mini pepperoni (hello pizza vibes!), breadcrumbs (panko + Parmesan = crunch crown!).
- Muffin tin + lollipop/popsicle sticks – Standard 12-cup tin works. Grease WELL with butter or non-stick spray. Sticks: Wooden craft sticks (found at dollar stores) or reusable popsicle sticks.
Building Your Pops: Step-by-Step Fun
- Preheat & Prep: Fire up that oven to 375°F (190°C)! While it warms, grease your muffin tin like you’re buttering toast for a giant – every nook matters! Chef’s hack: Use a pastry brush for thin, even coverage.
- The Big Mix: In a big bowl, combine cooked pasta, shredded cheese, and egg. Channel your inner DJ – fold GENTLY with a rubber spatula to keep pasta intact. Overmixing = mushy pops! Toss in any mix-ins now (pepperoni confetti, anyone?).
- Scoop & Pack: Spoon mixture into muffin cups, filling 3/4 full. PRESS DOWN FIRMLY with the back of a spoon – this compacts everything so pops hold shape. No air pockets allowed! Wipe any spills on the tin’s surface to prevent burnt edges.
- Stick the Landing: Insert sticks straight down the center, pushing until they hit the tin’s bottom. Angle slightly inward like a lollipop for stability. Stick rebellion? If they lean, prop them against adjacent cups during baking.
- Bake to Glory: Bake 12-15 minutes until edges are golden and centers feel set (no jiggle!). For extra crunch, sprinkle breadcrumbs in the last 5 minutes. Watch closely – oven temps vary!
- Cool & Freeze: Let pops cool IN THE TIN for 15 mins (they firm up!). Transfer to a wire rack until room temp. Freeze uncovered 1 hour (so sticks set), then bag in freezer zip-tops. Label with date – they’re good for 3 months!
- Reheat & Revel: Microwave (30-45 secs) for melty centers, or toaster oven (10 mins at 350°F) for crispy edges. Hold the stick while reheating – it gets hot!
Dipping, Drizzling, Devouring!
Serve these pops like edible trophies! For kids, plant them upright in mason jars filled with dry rice for a fun “pop stand.” Adults? Fan them on a platter with ramekins of marinara, garlic ranch, or pesto for dipping. Lunchbox pro move: Tuck 2 pops in a thermos (they’ll thaw by lunch – just give the thermos a shake!). Pair with carrot sticks or apple slices to balance the cozy carb hug. Game-day bonus: Skewer mini meatballs between pops on a board for “surf ‘n turf” bites!
Shake Up Your Pop Flavor!
- Buffalo Chicken Mac: Swap mac for shredded rotisserie chicken + 1/4 cup buffalo sauce. Blue cheese crumbles on top!
- Veggie Lover’s: Use spaghetti with marinara. Fold in roasted zucchini, mushrooms, and spinach. Vegan? Skip egg, use flax, and dairy-free cheese!
- Breakfast Pops: Bacon bits + scrambled eggs mixed into cheesy pasta. Top with everything bagel seasoning!
- Gluten-Free: GF pasta + GF breadcrumbs. Works like a charm!
- Taco Twist: Ground beef taco meat + cheddar in mac. Serve with salsa “dip” and avocado crema.
Wyatt’s Whispered Wisdom
Confession: My first batch looked like pasta grenades – sticks flew everywhere! Lesson learned: packing is everything. Now I pretend I’m stuffing treasure chests. Also, these pops evolved from my “lazy lasagna cups” phase – same tin, new attitude! The beauty? They’re forgiving. Too dry? Add spoonful of milk before baking. Too wet? Extra breadcrumbs. My favorite “oops” became a win: I once used day-old fettuccine Alfredo – creamy luxury pops! Moral: Your kitchen, your rules. Just promise me you’ll eat one straight from the freezer once (it’s oddly delicious, like cheesy pasta ice cream… trust me).
Pasta Pop Pitfalls? We’ve Got Answers!
Q: Help! My sticks won’t stay put!
A: Three tricks: 1) Pack mixture TIGHTLY around the stick base. 2) Freeze UNCOVERED first (1 hour firms them up). 3) If baking, angle sticks inward so they “lean” on tin walls.
Q: Can I skip the egg?
A: Absolutely! For binding, use 1 tbsp chia seeds + 3 tbsp water (wait 10 mins), or 2 tbsp cream cheese. Texture will be denser but still delish.
Q: Why bake before freezing? Can I freeze raw?
A: Baking sets the shape so they don’t crumble later! Freezing raw risks sogginess and stick instability. Worth the 15 mins, I promise.
Q: Microwave vs. toaster oven – which is better?
A: Microwave = fastest melt (30 secs). Toaster oven = crispy edges (10 mins at 350°F). For lunchboxes? Microwave frozen pop 45 secs at home, wrap in foil – stays warm!
Quick Bite Breakdown
(Based on mac & cheese version, per pop)
Calories: 160 | Protein: 6g | Carbs: 18g | Fat: 7g | Fiber: 1g | Sodium: 220mg
Note: Add-ins like veggies boost fiber, pepperoni adds protein/sodium. Customize to your needs!