Hey There, Taco Lovers!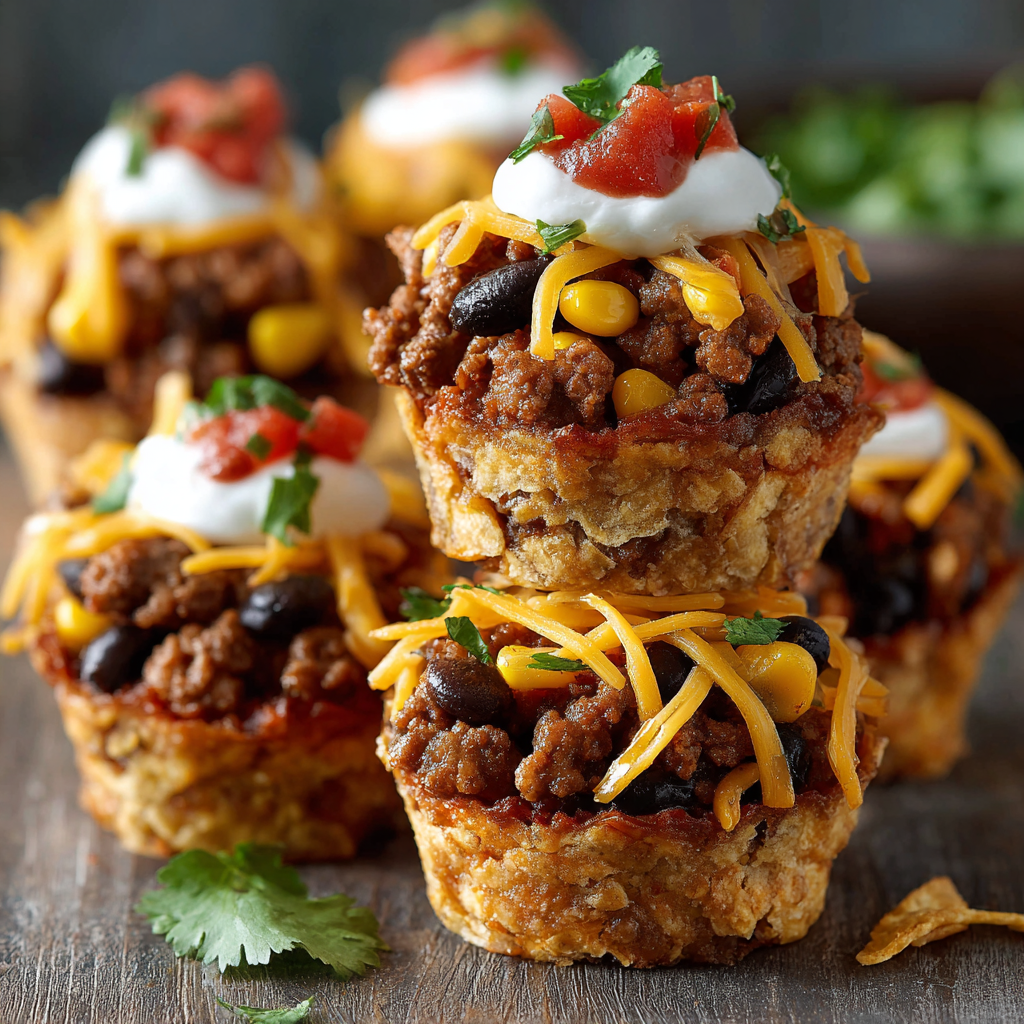
Alright, y’all – gather ‘round the digital campfire! Wyatt here, your flavor-obsessed buddy who lives for those moments when a dish makes everyone at the table go dead silent because they’re too busy chewing. You know the drill: Taco Tuesday rolls around, and suddenly it’s a fiesta of sizzling skillets, chopped toppings, and that glorious chaos of build-your-own tacos. But what if I told you we could keep all that spicy magic and ditch the messy fallout? Enter: my Taco Tuesday Muffin Tin Stacks. These little guys are your taco night heroes – all the bold, beefy, cheesy goodness you crave, baked into adorable, stackable bites using a humble muffin tin. No more rogue lettuce escapes or crumbled shells! They’re perfect for weeknights when time’s tight, killer for game-day spreads, and honestly? Watching kids (or adults!) try to snag the cheesiest stack off the pan is pure comedy gold. So, grab that apron – the fun’s about to get baked!That Time Taco Night Saved the Rainy Day
Picture this: It’s a soggy Saturday, the kind where your backyard BBQ plans dissolve faster than sugar in hot coffee. My nieces were visiting – two tornadoes of energy trapped indoors. Cue the meltdowns. My sister looked ready to crawl under the couch. Then I remembered an experiment hiding in my recipe notebook: muffin tin taco stacks. Desperation is the mother of invention, right? We raided the pantry. Ground turkey? Check. A half-crushed bag of corn chips? Perfect. We made it a game: “Who can layer the LOUDEST crunch?” They smashed chips like tiny chefs, giggled piling on beans, and fought over who got to sprinkle the cheese mountain. When those golden, cheesy towers came out? Silence. Just wide eyes and the frantic pointing of little fingers. That rainy day gloom vanished, replaced by sticky fingers, happy bellies, and my sister whispering, “Wyatt, you genius.” That’s the power of food, friends – it turns kitchen chaos into pure, cheesy joy.
Grab Your Flavor Arsenal
Print“Taco Tuesday” Muffin Tin Stacks

Give Taco Tuesday a tasty twist with these stackable taco bites! Built in muffin tins and packed with layers of taco meat, beans, cheese, and crushed corn chips, these mini towers are baked to melty perfection. Top with sour cream and watch them disappear—perfect for dinners, parties, or lunchbox leftovers!
- Prep Time: 10 minutes
- Cook Time: 15 minutes
- Total Time: 25 minutes
- Yield: 6–8 taco stacks 1x
Ingredients
1/2 lb ground beef or turkey
1 tbsp taco seasoning
1/2 cup canned black beans, drained
1/2 cup corn kernels (fresh or frozen)
1 cup shredded cheddar or Mexican blend cheese
1 cup crushed corn chips or tortilla chips
Sour cream, salsa, chopped cilantro for topping
Muffin tin + nonstick spray
Instructions
Preheat oven to 375°F (190°C) and spray muffin tin with nonstick spray.
Brown ground meat in a skillet, add taco seasoning, and cook until fully done.
Layer each muffin cup: a spoonful of crushed chips, then taco meat, beans, corn, and cheese. Repeat if needed, ending with cheese.
Bake for 12–15 minutes until cheese is bubbly.
Let cool 5 minutes, then gently pop stacks out with a spoon.
Top with sour cream, salsa, or your favorite taco toppings.
Notes
Taco night just got more fun—and stackable! These muffin tin towers are bite-sized bliss with all your favorite flavors.
Nutrition
- Calories: 180–220
- Sodium: 300mg
- Fat: 11g
- Carbohydrates: 14g
- Fiber: 2g
- Protein: 12g
Here’s the beauty of these stacks – they’re flexible! Use what you’ve got. Here’s the lineup with my chef-y insights:
- 1/2 lb ground beef or turkey: Lean turkey keeps it lighter, but beef brings that classic richness. Insider Tip: Blot cooked meat with a paper towel – less grease means crispier stacks!
- 1 tbsp taco seasoning: Homemade or store-bought? No judgment! Want more kick? Add a pinch of cayenne. Sub Alert: Swap in 1 tsp chili powder + 1/2 tsp cumin + 1/4 tsp garlic powder if you’re out.
- 1/2 cup canned black beans, drained & rinsed: Adds heartiness and fiber. Chef’s Whisper: Rinsing removes that starchy can liquid – key for texture!
- 1/2 cup corn kernels: Frozen works great (thaw it quick under hot water!). Fresh off the cob in summer? *Chef’s kiss*. Fun Swap: Try fire-roasted corn for a smoky twist.
- 1 cup shredded cheddar or Mexican blend cheese: The glue! Mexican blend melts dreamily. Pro Move: Grate your own – pre-shredded has anti-caking agents that can make melting less smooth.
- 1 cup crushed corn chips or tortilla chips: Your crunchy foundation! Flavor Hack: Use hint-of-lime or spicy nacho chips for an extra flavor layer!
- Sour cream, salsa, chopped cilantro for topping: The cool, the spicy, the fresh! Sub City: Greek yogurt for sour cream, pico de gallo for salsa, parsley if cilantro’s not your thing.
- Muffin tin + nonstick spray: Essential gear! A standard 12-cup tin is perfect. Spray Wisdom: Don’t skimp! Get those cups slick for easy popping later.
Let’s Build Some Delicious Towers!
Ready? This is where the fun (and minimal cleanup!) happens. Follow these steps like you’re building flavor skyscrapers:
- Fire Up & Prep: “Preheat your oven to 375°F (190°C). Give that muffin tin a generous shower of nonstick spray. Seriously, coat every nook – your future self will thank you when those stacks slide right out!”
- Brown & Season That Meat: “Crumble your ground beef or turkey into a skillet over medium-high heat. Cook it through until no pink remains, breaking it up like you mean it. Drain any excess grease (blotting helps!). Now, sprinkle in that taco seasoning and a splash of water (about 2 tbsp). Stir, sizzle, and let it mingle for 1-2 minutes until fragrant. Take it off the heat. Flavor Boost: Sneak in 1 tbsp tomato paste with the seasoning for deeper umami!”
- Layer Like a Boss: “Time for architecture! Grab your crushed chips. Spoon about 1 tablespoon into the bottom of each muffin cup – press lightly to form your crunchy base. Next, add a spoonful of that glorious seasoned meat (about 1 heaping tbsp). Now, sprinkle on some black beans and corn kernels. Top it all with a generous pinch of cheese (cheese is the roof!). Want taller towers? Repeat the layers: chips, meat, beans/corn, CHEESE! Always finish with cheese – it’s the golden crown. Pro Tip: Don’t overfill! Leave a tiny gap at the top for melting expansion.”
- Bake to Bubbly Bliss: “Slide that tin into your preheated oven. Bake for 12-15 minutes. You’re waiting for that magical moment: the cheese is completely melted, gloriously bubbly, and the edges of the chips are kissing golden brown. Your kitchen will smell like a taqueria dream!”
- The Grand Release: “PATIENCE, chef! Pull the tin out and let those stacks rest for 5 full minutes right on the counter. This lets them set! Then, gently run a small spoon or butter knife around the edge of each cup. Carefully lift underneath and pop them out. If they resist? A little more coaxing with the spoon usually does it. Hack: Tilt the tin sideways – gravity helps!”
- Top & Devour: “Transfer your mini masterpieces to a plate. Now, the fun part: dollop with cool sour cream, spoon on vibrant salsa, and shower with fresh chopped cilantro. Dive in while they’re warm and gloriously gooey!”
How to Serve ‘Em Up Right
Presentation is half the fun with these edible towers! Slide them onto a bright platter or individual plates. Keep toppings (sour cream, salsa, extra cilantro, maybe sliced jalapeños or avocado) in small bowls nearby for a DIY touch. They’re finger food royalty – perfect for passing around! Pair with a simple side salad or Spanish rice. For parties? Double the batch and watch them vanish faster than you can say “¡Olé!” Leftovers? Pop them cold into lunchboxes – they’re surprisingly sturdy and delicious at room temp.
Shake Up Your Stack Game!
Don’t stop at classic beef! These stacks are flavor canvases:
- Fiesta Chicken: Swap ground meat for 1.5 cups shredded rotisserie chicken mixed with taco seasoning and 1/4 cup salsa.
- Veggie Powerhouse: Skip the meat! Use 1 cup cooked quinoa or lentils seasoned like taco meat. Add extra beans, corn, and diced bell peppers.
- Breakfast Taco Stacks: Layer crushed hash browns, cooked scrambled eggs with taco seasoning, black beans, cheese, and top with pico de gallo after baking!
- Seaside Twist: Use seasoned cooked shrimp or flaked salmon instead of beef. Swap black beans for black-eyed peas and top with avocado crema.
- Keto-Friendly: Skip the corn chips! Use a base of finely chopped cauliflower rice (squeezed dry!) mixed with 1 egg and 1/4 cup cheese, pressed into the cups and pre-baked for 5 mins before layering.
Wyatt’s Whispers from the Kitchen
Okay, full disclosure: my first attempt at these? Let’s just say I learned the hard way that skipping the nonstick spray turns your stacks into “taco cement.” A lesson in grease! Over time, I’ve embraced the chaos – sometimes I’ll throw in a handful of diced green chiles or a sprinkle of cotija cheese for extra zing. The beauty is they’re practically foolproof once you nail the release. My buddy Dave insists on adding a tiny dollop of refried beans between layers – messy but delicious! And that “legendary leftovers” bit in my bio? This recipe birthed that. Cold stacks? Shockingly good. These little towers remind me that cooking shouldn’t be fussy. It’s about laughter, experimentation, and cheesy, crunchy victories. Now go make some memories (and maybe a small mess)!
Taco Stack SOS: Your Questions Answered
Ran into a snag? Don’t sweat it! Here’s the fix:
- “Help! My stacks fell apart!” Ah, the classic crumble. Usually means: 1) You didn’t let them rest long enough after baking (that 5-minute cool is CRUCIAL for setting). 2) You skimped on the binding agent (cheese!). Make sure you have a good cheese layer on top to seal it. 3) Overfilling the cups – keep layers compact but leave headroom. 4) Not enough chip base – press that first layer firmly!
- “Can I make these ahead?” Totally! Assemble the stacks (unbaked) in the greased tin, cover tightly with plastic wrap, and refrigerate for up to 24 hours. Add 1-2 extra minutes to the bake time since they’ll be cold. I don’t recommend freezing pre-assembled, but baked stacks freeze beautifully! Cool completely, freeze on a tray, then bag. Reheat in a 350°F oven for 10-15 mins.
- “My cheese browned too fast!” Oven hotspots happen! If the cheese is getting too dark before the filling is hot, tent the tin loosely with aluminum foil for the last few minutes of baking. Also, ensure your rack is in the center of the oven.
- “Can I use flour tortillas instead of chips?” You bet! Cut small corn tortillas into strips or use crushed tortilla chips. Avoid large flour tortilla pieces; they can get gummy. The chip crunch is iconic, but tortilla strips work in a pinch – just spray them lightly with oil before layering for better texture.
Nutritional Nibbles (Approximate Per Stack)
Calories: 180-220 | Protein: 12g | Carbs: 14g | Fat: 11g | Fiber: 2g | Sodium: 300mg
Note: Values vary based on specific ingredients (e.g., meat leanness, cheese type, chip amount). Using ground turkey and low-fat cheese lowers fat/calories. Toppings add extra!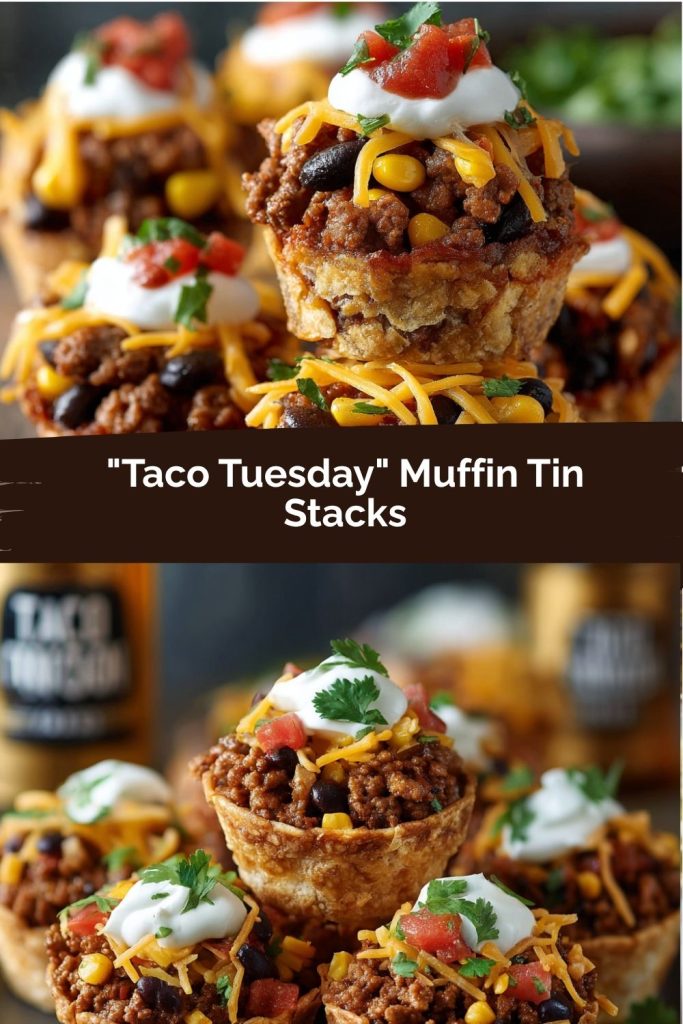
Final Thoughts
Whether you’re wrangling hangry kids, hosting a game night, or just craving something wildly fun and flavor-packed, these Taco Tuesday Muffin Tin Stacks are a total win. They take everything we love about tacos – the crunch, the spice, the cheesy goodness – and turn it into a portable, no-fuss party on a plate. They’re endlessly customizable, delightfully messy (in the best way), and guaranteed to bring smiles from the first bite to the last crumb. So next time taco night rolls around, think outside the shell – and stack it up instead!